
How to Upload HD Photos to Facebook: A Step-by-Step Guide
Introduction:
Social media platforms like Facebook have become integral parts of our lives, allowing us to connect, share, and express ourselves in various ways. One of the most common activities on Facebook is sharing photos, and in today’s visually-driven world, uploading high-definition (HD) photos has become increasingly important. In this comprehensive guide, How to Upload HD Photos to Facebook step by step, ensuring that your images maintain their quality and clarity.
Understanding How to Upload HD Photos to Facebook:
Before diving into the upload process, it’s essential to understand what exactly constitutes an HD photo. HD, short for high-definition, refers to images with a higher resolution and pixel density, resulting in sharper and more detailed visuals. On Facebook, HD photos stand out in users’ feeds, capturing attention and enhancing the viewing experience.
Preparing Your HD Photos:
Before uploading your photos to Facebook, it is crucial to ensure they are adequately prepared to maintain their quality. Start by selecting the highest resolution version of your photos, preferably in formats like JPEG or PNG. Avoid compressing or resizing your images excessively, which can degrade their quality.
Accessing Facebook’s Upload Interface:
To begin uploading, login to your Facebook account and navigate to the homepage or your profile. Look for the “Photo/Video” option near the status update box or under the “More” tab. Click on this option to access Facebook’s upload interface.
Uploading HD Photos:
Once you’ve accessed the upload interface, click on the “Photo/Video” button to select the HD photos you want to upload from your device. Facebook will display a file explorer window allowing you to browse and choose images from your computer or smartphone. Select the desired picture and click “Open” to initiate the upload process.
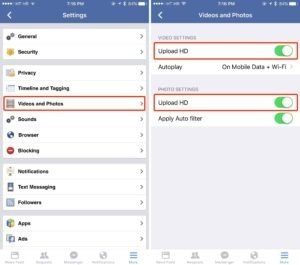
Enabling HD Photo Upload:
Enabling the HD photo upload option in Facebook’s settings is essential to ensure that your photos are uploaded in HD quality. After selecting your images for upload, look for the “HD” toggle switch or option near the bottom of the upload interface. Enable this option to upload your photos in high definition.
Adding Captions and Tags:
Before finalizing the upload, take the time to add captions, tags, and descriptions to your photos. Captions provide context and enhance engagement, while tags let you mention friends or identify individuals in the pictures. Utilize these features to make your images more searchable and shareable on Facebook.
Reviewing and Editing:
Once your photos are uploaded, please take a moment to review them and make any necessary edits or adjustments. Facebook provides essential editing tools like cropping, rotating, and applying filters to enhance your photos further. Ensure your photos look their best before sharing them with your friends and followers.
Sharing Your HD Photos:
After reviewing and editing your photos, it’s time to share them with the world. Please choose the appropriate privacy settings for your post, whether you want it to be visible to the public, your friends, or specific custom lists. Click the “Post” button to share your HD photos on Facebook.
Importance:
If you still have a question: How to Upload HD Photos to Facebook? We want to believe this guide has proven useful to you and answered your question. Uploading HD photos to Facebook doesn’t have to be a daunting task. Follow this step-by-step guide; you can ensure that your photos maintain quality and clarity, captivating your audience and enhancing your online presence. Whether sharing cherished memories with friends or promoting your business, uploading HD photos on Facebook is the key to making a lasting impression in the digital world. So, upload these stunning HD photos today and make your Facebook profile stand out!