How to Send an Invitation on Gmail in 2024: Your Ultimate Step-by-Step Guide
How to send an invitation on gmail? Sending an invitation via Gmail is straightforward and leverages Google Calendar, a tool seamlessly integrated with your email account. This integration allows you to create and send detailed invitations, track RSVPs, and even update guests on real-time changes. Whether you’re organizing a corporate meeting, a casual get-together, or a significant event like a wedding, Gmail’s invitation feature can simplify the process, making it efficient and hassle-free.
Why Use Gmail for Your Invitations?
- Efficiency: Create and send invitations directly from your email account without needing third-party applications.
- Integration: Gmail’s integration with Google Calendar ensures that you and your recipients can easily add and track events.
- Cost-effective: Sending invitations through Gmail is free, reducing the need for printed invitations and postage.
- Real-time Updates: Any changes to the event details are automatically updated for the invitees, keeping everyone informed.
Step-by-Step Guide: How to Send an Invitation on Gmail
Step 1: Access Google Calendar

- Open Google Calendar by clicking on the calendar icon from your Gmail account or navigating directly to the calendar website.
- Ensure you’re logged in with the account to which you wish to send the invitation.
Step 2: Create a New Event
- Click the “+” or “Create” button to initiate a new event.
- The event details include title, date, time, and location. Be as detailed as possible to provide clear information to your guests.
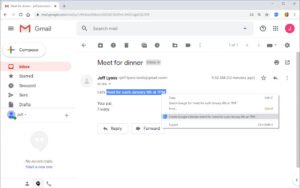
Step 3: Add Guests

- In the “Add guests” section, enter the email addresses of the people you invite. Gmail allows you to add contacts directly from your address book for convenience.
Step 4: Customize Your Invitation
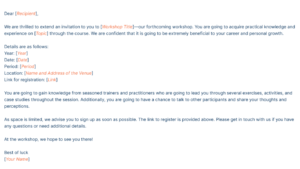
- Add a personalized message to your invitation to give it a personal touch. This could include information about the event, dress code, or other relevant details.
Step 5: Set Event Permissions
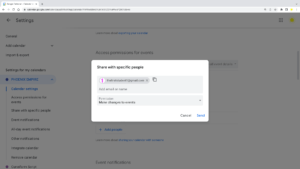
- Choose whether guests can invite others, see the guest list, or modify the event. These options give you control over the privacy and exclusivity of your event.
Step 6: Send the Invitation
- Once satisfied with the details and your message, click “Save” and “Send” to distribute your invitations.
- Your guests will receive an email invitation, which they can respond to with a click. Their responses (Yes, No, or Maybe) will be visible in Google Calendar.
Tips for a Successful Gmail Invitation
- Double-check details: Ensure that the event information is accurate before sending.
- Personalize your message: A personalized invitation is more engaging and will likely get a better response.
- Follow-up: Consider sending a reminder to those who haven’t responded a few days before the event but have yet to respond.
Troubleshooting Common Issues
Sometimes, invitees still need to receive the invitation. This could be due to incorrect email addresses, spam filters, or settings in their email accounts. Verify the email addresses for accuracy and advise your guests to check their spam or junk folders if they cannot find the invitation.
Importance
Learning how to send an invitation on Gmail is invaluable in today’s digital world. Whether for professional gatherings, casual meetups, or significant celebrations, Gmail’s integration with Google Calendar provides a seamless, efficient, and effective way to manage your events. By following the step-by-step guide, you can ensure that your event details are communicated clearly and concisely, making organizing an event much more manageable. Remember, the key to a successful invitation lies in the details and the personal touches that make your guests feel genuinely welcomed.