Fix Hypervisor Error in Windows 11: (10 Methods)
Introduction:
Experiencing a Blue Screen of Death (BSOD) is not uncommon for Windows users. Fortunately, most BSOD errors stem from software issues and are relatively simple. Windows 11 users have recently encountered the troublesome HYPERVISOR ERROR among the myriad of BSOD stop codes.
This error often emerges unexpectedly during gameplay, leading to an abrupt PC crash. If you’re facing this daunting issue, worry not. Our guide delves into effective troubleshooting methods to rectify the Hypervisor error in Windows 11, enhancing your system’s stability and performance.
Understanding the Hypervisor Error in Windows 11
The Hypervisor Platform, pivotal in virtualization technology, enables the running of virtual machines on your computer. It supports operating various operating systems through virtualization software like VMware, VirtualBox, or Microsoft’s Windows Sandbox.
Hypervisor Error primarily surfaces due to issues with Hyper-V settings, including improper configuration, outdated drivers, corrupted system files, or hardware malfunctions such as faulty RAM.
Strategies to Overcome HYPERVISOR_ERROR BSOD in Windows 11
Tackling the HYPERVISOR_ERROR requires a systematic approach, as the precise cause can vary. Below, we outline ten effective methods to resolve this error and restore your system’s functionality.
-
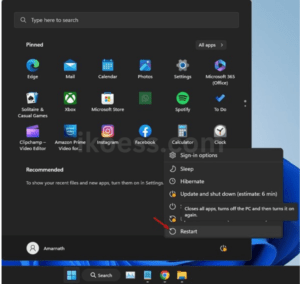
Initiate a System Restart
Start with the simplest solution: restart your computer. This action facilitates the installation of pending updates and eradicates temporary glitches. Navigate to the Power Menu via the Windows Start button and select “Restart.” Post-restart, proceed with the subsequent troubleshooting steps if the issue persists.
-
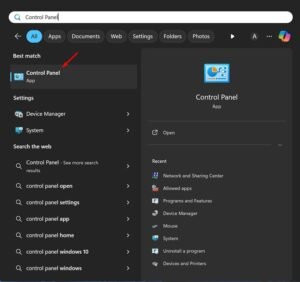
Disable the Hypervisor
Disabling Hypervisor might resolve the issue for users not utilizing virtual machines. Here’s how:
- Access the Control Panel by searching in Windows 11.
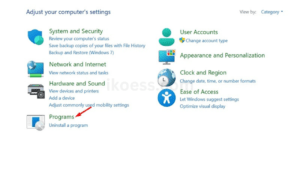
- Click on “Programs” followed by “Turn Windows Features On or Off.”
- Locate and uncheck the “Windows Hypervisor Platform” option, then click “OK.”
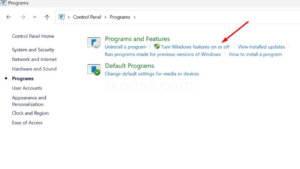
Afterwards, reboot your system to effectuate the changes.
-
Restart Hyper-V Services
Restarting Hyper-V Services can be a vital step in fixing the HYPERVISOR_ERROR:
- Search for “Services” in Windows 11 and open the app.
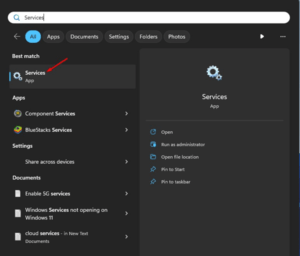
- Locate all Hyper-V Services, right-click each, and choose “Restart” or “Stop” followed by “Start” if the restart option is unavailable.
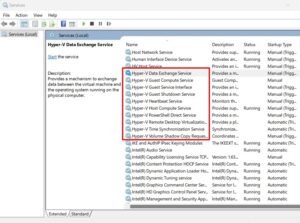
Ensure all Hyper-V-related services are restarted.
-
Address Memory Issues
Memory problems are often the culprits behind the HYPERVISOR_ERROR. Utilize the Windows Memory Diagnostic Tool to detect and address any RAM issues:
- Search for and launch the Windows Memory Diagnostic tool.
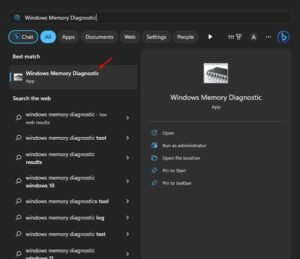
- Choose “Restart now and check for problems” to commence the diagnostic process.
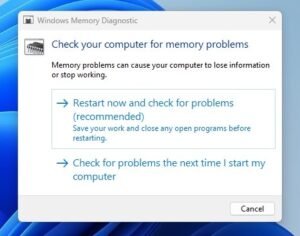
Follow the tool’s guidance to resolve detected memory issues.
-
Utilize the DISM Tool
Corrupted system files can lead to the HYPERVISOR_ERROR. Deploy the Deployment Image Servicing and Management (DISM) tool to repair these files:
- Open Command Prompt as administrator.

- Execute the command DISM.exe /Online /Cleanup-image /Restorehealth.
DISM.exe /Online /Cleanup-image /Restorehealth |

Restart your computer post-completion.
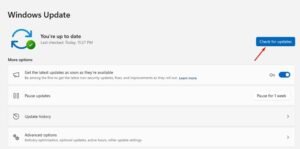
Update Windows 11
Ensure your system is up to date by checking for and installing any available Windows updates. This process can also update critical drivers.
Check for Driver Updates
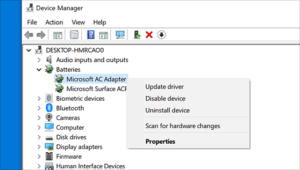
Manually check for updates for your device drivers, particularly those related to hardware virtualization, through the Device Manager or the manufacturer’s website.
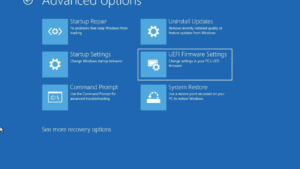
Verify BIOS/UEFI Settings
Ensure that virtualization settings in your BIOS/UEFI are correctly configured. Access your BIOS/UEFI settings during the system boot-up and enable any disabled virtualization options.
Scan for Malware
Malicious software can sometimes cause system instability. Run a thorough malware scan using Windows Security or your preferred antivirus software to eliminate potential threats.
Reset Windows 11
If all else fails, consider resetting Windows 11 while opting to keep your files. This step reinstalls Windows, potentially eliminating the underlying cause of the HYPERVISOR_ERROR.

- Go to Settings > System > Recovery and select “Reset PC.”
- Follow the prompts to keep your files for a less disruptive process.
Importance”
The HYPERVISOR ERROR in Windows 11 can be challenging, yet adhering to the outlined steps can significantly enhance your chances of resolution. While this error can disrupt your computing experience, systematic troubleshooting offers a path to recovery. Should the problem persist, further investigation or professional assistance may be required. Our guide aims to empower you with the knowledge to tackle this issue, ensuring a stable and efficient Windows 11 environment.
FAQ:
Why is hypervisor error when installing Windows 11?
Hypervisor errors when installing Windows 11 often stem from incompatibility or misconfiguration of virtualization settings in the BIOS/UEFI, necessitating a check and adjustment of these settings to ensure compatibility.
How do I fix my hypervisor?
To fix your hypervisor, verify that virtualization is enabled in your system’s BIOS/UEFI settings, then update your BIOS/UEFI firmware along with Windows and drivers to the latest versions to resolve any compatibility issues.
How do I fix blue screen hypervisor error?
Fixing a blue screen hypervisor error usually involves:
- Updating your system’s BIOS/UEFI.
- Ensuring Windows and all drivers are up-to-date.
- Verifying that virtualization technology is enabled and configured correctly in the BIOS/UEFI.